Four solaire 45° : Différence entre versions
| Ligne 243 : | Ligne 243 : | ||
| 31 | 10mm | 820 x 30 | 2 | | | 31 | 10mm | 820 x 30 | 2 | | ||
| + | |||
| + | | 32 | 10mm | 490 x 50 | 2 | | ||
| + | |||
| + | | 33 | 10mm | 550 x 40 | 2 | | ||
| + | |||
| + | | 34 | 10mm | 720 x 20 | 2 | | ||
| + | |||
| + | ---- | ||
| + | ENGLISH VERSION | ||
| + | ---- | ||
| + | 45° solar oven, "Breton type" (in France, where Asterix and Obelix live ;) ) | ||
| + | |||
| + | == Plans == | ||
| + | |||
| + | [[Fichier:fs45.png]] | ||
| + | |||
| + | ''Figure 1: The oven is completed'' | ||
| + | |||
| + | == The lateral triangles == | ||
| + | |||
| + | Make 2 isosceles right-angled triangles with a 5mm thick plywood | ||
| + | |||
| + | [[Fichier:fs1.png]] | ||
| + | |||
| + | Fill the 3 sides of these triangles with 25x25 cleats. | ||
| + | |||
| + | Cover these two triangles with aluminum offset plate. | ||
| + | |||
| + | Make a double fold of aluminum on the cleats 2 and 3. | ||
| + | |||
| + | == The bottom of the cooker == | ||
| + | |||
| + | You need: | ||
| + | * A 5mm thick plywood : 540 x 490 | ||
| + | * 25 x 25 cleats | ||
| + | * A cleat of 25 x 50 beveled at 45 ° | ||
| + | [[Fichier:fs2.png]] | ||
| + | |||
| + | Perform the assembly and cover the bottom with aluminum offset plate. | ||
| + | |||
| + | Make a double fold on the cleat 5. | ||
| + | |||
| + | == The transom door == | ||
| + | |||
| + | You need: | ||
| + | * A 230 x 490 plywood | ||
| + | * 25 x 25 cleats | ||
| + | * A cleat of 25 x 50 beveled at 45 ° | ||
| + | |||
| + | [[Fichier:fs3.png]] | ||
| + | |||
| + | Carry out the assembly and cover with aluminum. | ||
| + | Make a double fold of aluminum on the cleat 9. | ||
| + | |||
| + | == The door of the cooker == | ||
| + | You need | ||
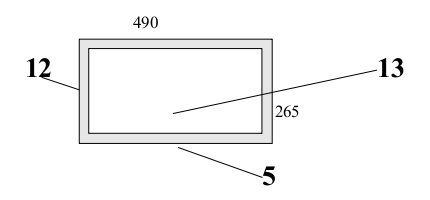
| + | * A 490 x 265 plywood. | ||
| + | * A set of cleats on the perimeter of this rectangle. | ||
| + | [[Fichier:fs4.png]] | ||
| + | |||
| + | Planing the door, so that the closure suits the best. | ||
| + | |||
| + | Cover the door with an aluminum offset plate. | ||
| + | |||
| + | == The oven body == | ||
| + | |||
| + | Carry out the assembly with precision, the two triangular sides with the bottom of the oven, the transom, and the open bay of the door. | ||
| + | |||
| + | [[Fichier:fs5.png]] | ||
| + | |||
| + | [[Fichier:fs6.png]] | ||
| + | |||
| + | ''Figure 2: Here is the assembly'' | ||
| + | |||
| + | == The oblique jamb == | ||
| + | |||
| + | You need two 25 mm thick boards, 90 mm wide and 1500 mm long. | ||
| + | |||
| + | [[Fichier:fs7.png]] | ||
| + | [[Fichier:fs8.png]] | ||
| + | |||
| + | ''Figure 3: The oblique jamb'' | ||
| + | |||
| + | We will fix the oblique jamb and feet of the oven on the 25 x 25 cleats of the side triangles. The cover of the sides, the bottom of the transom and the door will be done by cutting paneling downgraded after filling the empty space with insulation. A foam seal on the exceedance of the door will finish the closure. | ||
| + | |||
| + | '''Articulated reflectors''' | ||
| + | |||
| + | For each reflector you need plywood and cleats. | ||
| + | |||
| + | ^ East reflector ^ Reference ^ | ||
| + | |||
| + | | A 670 x 500 plywood | 18 | | ||
| + | |||
| + | | A 25 x 25 cleat . 670 (hinge cleat) | 19 | | ||
| + | |||
| + | | 2 cleats of 25 x 15 . 485 | 20 | | ||
| + | |||
| + | ^ West Reflector''' ^ Reference ^ | ||
| + | |||
| + | | A 620 x 500 plywood | 21 | | ||
| + | |||
| + | | A 25 x 25 cleat . 620 (hinge cleat) | 22 | | ||
| + | |||
| + | | 2 cleats of 25 x 25 . 485 | 20 | | ||
| + | |||
| + | ^ Horizontal reflector ^ Reference ^ | ||
| + | |||
| + | | A 800 x 600 plywood | 23 | | ||
| + | |||
| + | | 2 25 x 25 cleats . 800 | 24 | | ||
| + | |||
| + | | 2 25 x 25 cleats . 550 | 25 | | ||
| + | |||
| + | | A 25 x 35 cleat . 610 (articulating cleat) | 26 | | ||
| + | |||
| + | ^ Vertical reflector ^ Reference ^ | ||
| + | |||
| + | | A 900 x 600 plywood | 27 | | ||
| + | |||
| + | | 2 25 x 25 cleats . 900 | 28 | | ||
| + | |||
| + | | 2 25 x 25 cleats . 550 | 25 | | ||
| + | |||
| + | | A 25 x 70 cleat . 610 (articulating cleat) | 29 | | ||
| + | |||
| + | | A 25 x 25 skid | 30 | | ||
| + | |||
| + | East and west reflectors will be maintained in a fixed position around 20 ° by a 25 x 25 cleat offcut and a small tip that will fit into the cleat 20. | ||
| + | |||
| + | == The glass == | ||
| + | |||
| + | The dimensions of the window are 720 x 510. The thickness is between 3 and 5 mm.. | ||
| + | |||
| + | Cover the oblique part of the triangular box with 10mm wooden sticks made in wood paneling. Put some cartridge glue to finish the joint if necessary because of aluminum exceedance. | ||
| + | |||
| + | | 2 10mm sticks 820 x 30 | 31 | | ||
| + | |||
| + | | 2 10mm sticks 490 x 50 | 32 | | ||
| + | |||
| + | | 2 5mm sticks (plywood) 550 x 40 | 33 | | ||
| + | |||
| + | | 2 5mm sticks (plywood) 720 x 20 | 34 | | ||
| + | |||
| + | [[Fichier:fs9.png]] | ||
| + | |||
| + | ''Figure 4: Reflectors and glass'' | ||
| + | |||
| + | == The black plate== | ||
| + | |||
| + | | Back plate of oven 470 x 470 | 35 | | ||
| + | |||
| + | | On the door plate 250 x 470 | 36 | | ||
| + | |||
| + | | On the transom plate 220 x 470 | 37 | | ||
| + | |||
| + | We must maintain a space of about 1 cm between the sheet and the oven wall. This allows hot air to circulate throughout the oven. | ||
| + | |||
| + | For this, fix small wooden sticks under the sheets. Attach the sheet to the door and transom on the wall. In contrast, the back plate of the oven is not fixed but simply put, it helps to clean it out occasionally. | ||
| + | |||
| + | == The finish: door and wheels == | ||
| + | |||
| + | Fix a piano hinge on the bottom of the door, so that it opens like a conventional oven. | ||
| + | |||
| + | Screw a handle in the middle of the door : falling wood, leather strap, large cap... | ||
| + | |||
| + | Add two wheels on the back legs of the oven. Attach the wheels to carry the oven when it swing backward, like a garbage can. Make a 45 ° bevel at the tip of the oblique jamb to facilitate failover. | ||
| + | |||
| + | [[Fichier:fs10.png]] | ||
| + | |||
| + | ''Figure 5: it's ready!'' | ||
| + | |||
| + | == Required for the manufacture of a solar oven== | ||
| + | |||
| + | '''Summary of materials needed''' | ||
| + | |||
| + | * Plywood: a 250 x 125 panel | ||
| + | |||
| + | * Paneling: 2 square meters | ||
| + | |||
| + | * Boards of 25mm thickness: about 2 square meters | ||
| + | |||
| + | * Offset plates, reflectors or other reflecting material | ||
| + | |||
| + | * Black plates | ||
| + | |||
| + | * Rods, 5 or 6 mm in diameter: 2 m | ||
| + | |||
| + | * Piano hinges: 3 m | ||
| + | |||
| + | * Wheels, cartridge silicone, neoprene or other | ||
| + | |||
| + | * Screws 20, 30, 40, 50, 60mm | ||
| + | |||
| + | * Tip 20, 30mm | ||
| + | |||
| + | '''Parts summary''' | ||
| + | |||
| + | '' Plywood '' | ||
| + | |||
| + | ^ Reference ^ size ^ Item ^ Quantity ^ | ||
| + | |||
| + | | 1 | 560 x 560 | Lateral triangle | 2 | | ||
| + | |||
| + | | 8 | 490 x 530 | back | 1 | | ||
| + | |||
| + | | 11 | 490 x 230 | transom | 1 | | ||
| + | |||
| + | | 13 | 490 x 265 | door | a | | ||
| + | |||
| + | | 18 | 670 x 500 | East reflector | 1 | | ||
| + | |||
| + | | 21 | 620 x 500 | West reflector | 1 | | ||
| + | |||
| + | | 23 | 800 x 600 | horizontal reflector | 1 | | ||
| + | |||
| + | | 27 | 900 x 600 | Vertical Reflector | 1 | | ||
| + | |||
| + | '' Cleat '' | ||
| + | |||
| + | ^ Reference ^ size ^ length ^ Quantity ^ | ||
| + | | | 25 x 25 | 16 to 18m to resize | | | ||
| + | |||
| + | | 20 | 25 x 15 | 485 | 1 | | ||
| + | |||
| + | | 9 | 25 x 50 | 490 | 1 | | ||
| + | |||
| + | | 7 | 25 x 50 | 490 beveled at 45 ° | 1 | | ||
| + | |||
| + | | 26 | 25 x 35 | 610 | 1 | | ||
| + | |||
| + | | 29 | 25 x 70 | 610 | 1 | | ||
| + | |||
| + | | boards | 25 x 90 | 7 to 8 m to resize | | ||
| + | |||
| + | | Panelling | 10mm | 2 square meters to resize | | ||
| + | |||
| + | '' Sticks '' | ||
| + | |||
| + | ^ Reference ^ Thickness ^ size ^ Quantity ^ | ||
| + | |||
| + | | 31 | 10mm | 820 x 30 | 2 | | ||
| 32 | 10mm | 490 x 50 | 2 | | | 32 | 10mm | 490 x 50 | 2 | | ||
Version du 21 mars 2016 à 13:20
Schéma du four 45°, "type Breton"
Contributeur·ice·s
Statut du projet
Fonctionnel
Statut de la publication
License
CC-by-nc-3.0
Inspiration
Dominique Loquais
Fichiers source
Machines
Matériaux
Sommaire
- 1 Plans
- 2 Les triangles latéraux
- 3 Le fond du cuiseur
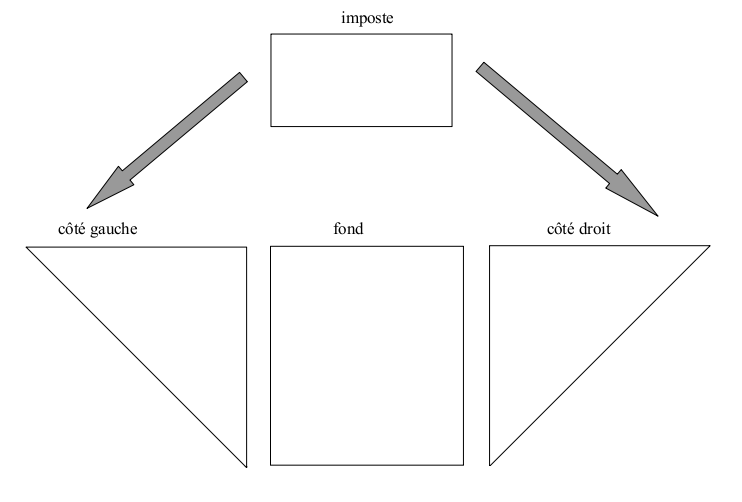
- 4 L'imposte de la porte
- 5 La porte du cuiseur
- 6 Le corps du four
- 7 Les montants obliques
- 8 La vitre
- 9 Les tôles noires
- 10 La finition : porte et roues
- 11 Nécessaire pour la fabrication d'un four
- 12 Plans
- 13 The lateral triangles
- 14 The bottom of the cooker
- 15 The transom door
- 16 The door of the cooker
- 17 The oven body
- 18 The oblique jamb
- 19 The glass
- 20 The black plate
- 21 The finish: door and wheels
- 22 Required for the manufacture of a solar oven
Plans
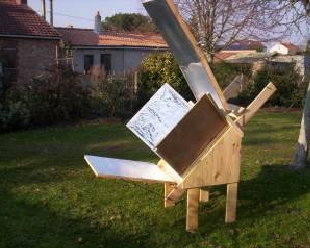
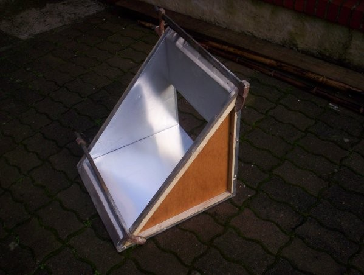
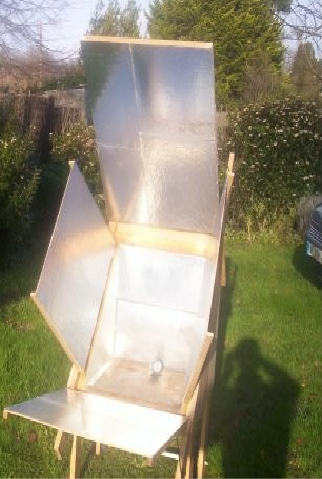
Illustration 1: Le four terminé
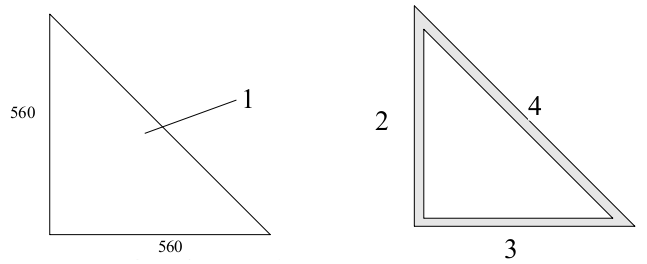
Les triangles latéraux
Réaliser 2 triangles-isocèles-rectangles avec un contre plaqué de 5mm
Garnir les 3 côtés de ces triangles avec des tasseaux de 25x25.
Recouvrir ces 2 triangles d'un alu plaque offset.
Faire un double pliage d'alu sur les tasseaux 2 et 3.
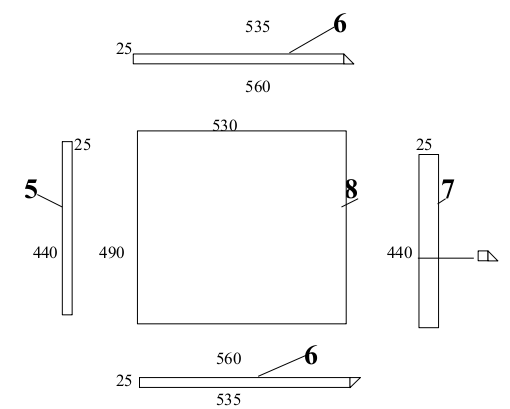
Le fond du cuiseur
il faut :
 * un contre-plaqué de 5mm : 540 x 490
 * des tasseaux de 25 x 25
 * un tasseau de 25 x 50 biseauté à 45°
Réaliser l'assemblage et recouvrir le fond avec de l'alu plaque offset.
Faire un double pliage sur le tasseau 5.
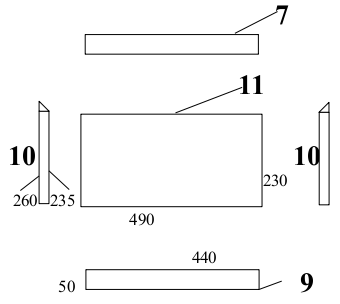
L'imposte de la porte
Il faut :
 * un contre-plaqué 230 x 490
 * des tasseaux de 25 x 25
 * un tasseau de 25 x 50 biseauté à 45°
Réaliser l'assemblage et le recouvrir d'alu. Faire un double pliage d'alu sur le tasseau 9.
La porte du cuiseur
il faut
 * un contre plaqué de 490 x 265.
 * un ensemble de tasseaux sur le périmètre de ce rectangle.
Raboter la porte à la demande ,de façon à ce que la fermeture s'adapte le mieux possible.
Habiller la porte avec un alu plaque offset.
Le corps du four
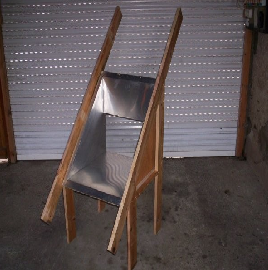
Réaliser l'assemblage avec précision, des 2 côtés triangulaires avec le fond du four, l'imposte, et la baie ouverte de la porte.
Illustration 2: Voici l'assemblage réalisé
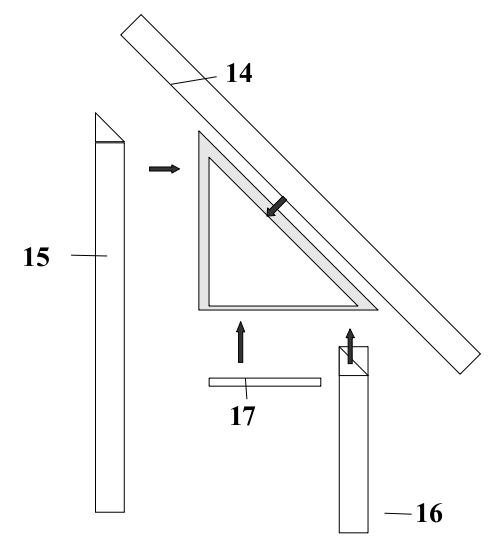
Les montants obliques
Il faut 2 planches de 25 mm d'épaisseur, de 90 mm de large, et de 1500mm de long.
Illustration 3: Les montants obliques
On fixera les montants obliques et les pieds du four sur les tasseaux de 25 x 25 des triangles latéraux. L'habillage des côtés, du fond, de l'imposte et de la porte se fera par une découpe de lambris déclassé après avoir rempli l'espace vide avec du calorifuge. Un joint mousse, collé sur le dépassement de la porte, finira la fermeture.
Les réflecteurs articulés
Pour chaque réflecteur, il faut un panneau de contre plaqué et des tasseaux.
^ Réflecteur Est ^ Référence ^
| 1 contre-plaqué de 670 x 500 | 18 |
| 1 tasseau de 25 x 25 . 670 (tasseau charnière) | 19 |
| 2 tasseaux de 25 x 15 . 485 | 20 |
^ Réflecteur Ouest ^ Référence ^
| 1 contre-plaqué de 620 x 500 | 21 |
| 1 tasseau de 25 x 25 . 620 (tasseau charnière) | 22 |
| 2 tasseaux de 25 x 25 . 485 | 20 |
^ Réflecteur horizontal ^ Référence ^
| 1 contre-plaqué 800 x 600 | 23 |
| 2 tasseaux 25 x 25 . 800 | 24 |
| 2 tasseaux 25 x 25 . 550 | 25 |
| 1 tasseau de 25 x 35 . 610 ( tasseau d'articulation) | 26 |
^ Réflecteur vertical ^ Référence ^
| 1 contre-plaqué de 900 x 600 | 27 |
| 2 tasseaux 25 x 25 . 900 | 28 |
| 2 tasseaux 25 x 25 . 550 | 25 |
| 1 tasseau 25 x 70 . 610 ( tasseau d'articulation) | 29 |
| 1 cale de fixation 25 x 25 | 30 |
Les réflecteurs Est et Ouest seront maintenus dans une position fixe à 20° environ à l'aide d'une chute de tasseau 25 x 25 et une petite pointe qui ira se loger dans le tasseau 20.
La vitre
Les dimensions de la vitre sont 720 x 510. L'épaisseur est comprise entre 3 et 5 mm.
Recouvrir les obliques de la boite triangulaire par des baguettes de bois de 10mm prises dans du lambris. Mettre un peu de colle cartouche pour finir le jointement si besoin à cause des dépassements d'aluminium.
| 2 baguettes 10mm 820 x 30 | 31 |
| 2 baguettes 10mm 490 x 50 | 32 |
| 2 baguettes 5mm (contre-plaqué) 550 x 40 | 33 |
| 2 baguettes 5 mm (contre-plaqué) 720 x 20 | 34 |
Illustration 4: Réflecteurs et vitre
Les tôles noires
| Tôle du fond de four 470 x 470 | 35 |
| Tôle sur la porte 250 x 470 | 36 |
| Tôle sur l'imposte 220 x 470 | 37 |
Il faut maintenir un espacement d'environ 1 cm entre la tôle et la paroi du four. Cela permet à l'air chaud de circuler derrière la tôle.
Pour cela, fixer des petites baguettes en bois sous les tôles. Fixer la tôle de la porte et de l'imposte sur la paroi. En revanche, la tôle du fond du four n'est pas fixée mais simplement posée, cela permet de la sortir pour la nettoyer de temps en temps.
La finition : porte et roues
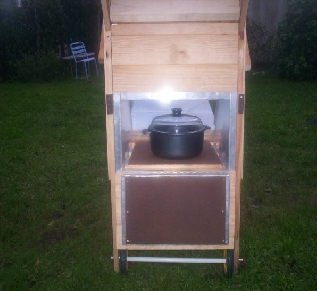
Fixer une charnière piano sur le bas de la porte, pour qu'elle s'ouvre comme un four classique.
Viser une poignée au milieu de la porte : chute de bois, lanière en cuir, gros bouchon...
Ajouter deux roulettes sur les montants arrières du four. Fixer l'axe des roues à une position telle qu'elles ne porteront le four que lorsqu'on le bascule en arrière. Faire un biseau à 45° à l'extrémité du montant pour faciliter le basculement.
Illustration 5: c'est prêt!
Nécessaire pour la fabrication d'un four
Récapitulatif des matériaux nécessaires
Contre- plaqué : 1 panneau de 250 x 125
Lambris : 2 mètres carrés environ
Planches de 25mm d'épaisseur : 2 mètres carrés environ
Plaques offset, vinibags ou matériaux réflecteurs
Tôles noires
Fer rond de 5 ou 6 mm de diamètre : 2ml
Charnières piano : 3ml
Roulettes, cartouche silicone, nèoprène ou autre
Vis de 20, 30, 40, 50, 60mm
Pointes de 20, 30mm
Récapitulatif des pièces construites
contre-plaqué
^ Référence ^ Taille ^ Pièce ^ Quantité ^
| 1 | 560 x 560 | triangle latéral | 2 |
| 8 | 490 x 530 | fond | 1 |
| 11 | 490 x 230 | imposte | 1 |
| 13 | 490 x 265 | porte | 1 |
| 18 | 670 x 500 | réflecteur est | 1 |
| 21 | 620 x 500 | réflecteur ouest | 1 |
| 23 | 800 x 600 | réflecteur horizontal | 1 |
| 27 | 900 x 600 | réflecteur vertical | 1 |
Tasseau
^ Référence ^ Taille ^ Longueur ^ Quantité ^
| | 25 x 25 | 16 à 18ml à retailler | |
| 20 | 25 x 15 | 485 | 1 |
| 9 | 25 x 50 | 490 | 1 |
| 7 | 25 x 50 | 490 biseauté à 45° | 1 |
| 26 | 25 x 35 | 610 | 1 |
| 29 | 25 x 70 | 610 | 1 |
| Planchette | 25 x 90 | 7 à 8 ml à retailler |
| Lambris | 10mm | 2 mètres carré à retailler |
Baguette
^ Référence ^ Épaisseur ^ Dimension ^ Quantité ^
| 31 | 10mm | 820 x 30 | 2 |
| 32 | 10mm | 490 x 50 | 2 |
| 33 | 10mm | 550 x 40 | 2 |
| 34 | 10mm | 720 x 20 | 2 |
ENGLISH VERSION
45° solar oven, "Breton type" (in France, where Asterix and Obelix live ;) )
Plans
Figure 1: The oven is completed
The lateral triangles
Make 2 isosceles right-angled triangles with a 5mm thick plywood
Fill the 3 sides of these triangles with 25x25 cleats.
Cover these two triangles with aluminum offset plate.
Make a double fold of aluminum on the cleats 2 and 3.
The bottom of the cooker
You need:
 * A 5mm thick plywood : 540 x 490
 * 25 x 25 cleats
 * A cleat of 25 x 50 beveled at 45 °
Perform the assembly and cover the bottom with aluminum offset plate.
Make a double fold on the cleat 5.
The transom door
You need:
 * A 230 x 490 plywood
 * 25 x 25 cleats
 * A cleat of 25 x 50 beveled at 45 °
Carry out the assembly and cover with aluminum. Make a double fold of aluminum on the cleat 9.
The door of the cooker
You need
 * A 490 x 265 plywood.
 * A set of cleats on the perimeter of this rectangle.
Planing the door, so that the closure suits the best.
Cover the door with an aluminum offset plate.
The oven body
Carry out the assembly with precision, the two triangular sides with the bottom of the oven, the transom, and the open bay of the door.
Figure 2: Here is the assembly
The oblique jamb
You need two 25 mm thick boards, 90 mm wide and 1500 mm long.
Figure 3: The oblique jamb
We will fix the oblique jamb and feet of the oven on the 25 x 25 cleats of the side triangles. The cover of the sides, the bottom of the transom and the door will be done by cutting paneling downgraded after filling the empty space with insulation. A foam seal on the exceedance of the door will finish the closure.
Articulated reflectors
For each reflector you need plywood and cleats.
^ East reflector ^ Reference ^
| A 670 x 500 plywood | 18 |
| A 25 x 25 cleat . 670 (hinge cleat) | 19 |
| 2 cleats of 25 x 15 . 485 | 20 |
^ West Reflector ^ Reference ^
| A 620 x 500 plywood | 21 |
| A 25 x 25 cleat . 620 (hinge cleat) | 22 |
| 2 cleats of 25 x 25 . 485 | 20 |
^ Horizontal reflector ^ Reference ^
| A 800 x 600 plywood | 23 |
| 2 25 x 25 cleats . 800 | 24 |
| 2 25 x 25 cleats . 550 | 25 |
| A 25 x 35 cleat . 610 (articulating cleat) | 26 |
^ Vertical reflector ^ Reference ^
| A 900 x 600 plywood | 27 |
| 2 25 x 25 cleats . 900 | 28 |
| 2 25 x 25 cleats . 550 | 25 |
| A 25 x 70 cleat . 610 (articulating cleat) | 29 |
| A 25 x 25 skid | 30 |
East and west reflectors will be maintained in a fixed position around 20 ° by a 25 x 25 cleat offcut and a small tip that will fit into the cleat 20.
The glass
The dimensions of the window are 720 x 510. The thickness is between 3 and 5 mm..
Cover the oblique part of the triangular box with 10mm wooden sticks made in wood paneling. Put some cartridge glue to finish the joint if necessary because of aluminum exceedance.
| 2 10mm sticks 820 x 30 | 31 |
| 2 10mm sticks 490 x 50 | 32 |
| 2 5mm sticks (plywood) 550 x 40 | 33 |
| 2 5mm sticks (plywood) 720 x 20 | 34 |
Figure 4: Reflectors and glass
The black plate
| Back plate of oven 470 x 470 | 35 |
| On the door plate 250 x 470 | 36 |
| On the transom plate 220 x 470 | 37 |
We must maintain a space of about 1 cm between the sheet and the oven wall. This allows hot air to circulate throughout the oven.
For this, fix small wooden sticks under the sheets. Attach the sheet to the door and transom on the wall. In contrast, the back plate of the oven is not fixed but simply put, it helps to clean it out occasionally.
The finish: door and wheels
Fix a piano hinge on the bottom of the door, so that it opens like a conventional oven.
Screw a handle in the middle of the door : falling wood, leather strap, large cap...
Add two wheels on the back legs of the oven. Attach the wheels to carry the oven when it swing backward, like a garbage can. Make a 45 ° bevel at the tip of the oblique jamb to facilitate failover.
Figure 5: it's ready!
Required for the manufacture of a solar oven
Summary of materials needed
* Plywood: a 250 x 125 panel
* Paneling: 2 square meters
* Boards of 25mm thickness: about 2 square meters
* Offset plates, reflectors or other reflecting material
* Black plates
* Rods, 5 or 6 mm in diameter: 2 m
* Piano hinges: 3 m
* Wheels, cartridge silicone, neoprene or other
* Screws 20, 30, 40, 50, 60mm
* Tip 20, 30mm
Parts summary
Plywood
^ Reference ^ size ^ Item ^ Quantity ^
| 1 | 560 x 560 | Lateral triangle | 2 |
| 8 | 490 x 530 | back | 1 |
| 11 | 490 x 230 | transom | 1 |
| 13 | 490 x 265 | door | a |
| 18 | 670 x 500 | East reflector | 1 |
| 21 | 620 x 500 | West reflector | 1 |
| 23 | 800 x 600 | horizontal reflector | 1 |
| 27 | 900 x 600 | Vertical Reflector | 1 |
Cleat
^ Reference ^ size ^ length ^ Quantity ^ | | 25 x 25 | 16 to 18m to resize | |
| 20 | 25 x 15 | 485 | 1 |
| 9 | 25 x 50 | 490 | 1 |
| 7 | 25 x 50 | 490 beveled at 45 ° | 1 |
| 26 | 25 x 35 | 610 | 1 |
| 29 | 25 x 70 | 610 | 1 |
| boards | 25 x 90 | 7 to 8 m to resize |
| Panelling | 10mm | 2 square meters to resize |
Sticks
^ Reference ^ Thickness ^ size ^ Quantity ^
| 31 | 10mm | 820 x 30 | 2 |
| 32 | 10mm | 490 x 50 | 2 |
| 33 | 10mm | 550 x 40 | 2 |
| 34 | 10mm | 720 x 20 | 2 |
